ONVIF is an open interface standard for network-based video devices that is increasingly supported by various manufacturers. If you have cameras or encoders supporting ONVIF, use this type of device.
ibaCapture supports the ONVIF profiles S and T.
Note |
|
|---|---|
|
In order to prevent malfunctions as far as possible, we recommend having installed the latest firmware for your ONVIF devices. |
|

As ONVIF compatible devices support an automatic detection, the easiest way is to click on the <Discover> button. A list of all detected, active ONVIF compatible cameras will be shown.

If the desired device is not shown in the list because it was turned off or not connected, then click on <Discover> after the device is turned on or connected.
Click on the desired device in order to select it and press <Choose> or double-click the device.
Note |
|
|---|---|
|
If the device is still not detected, check the firmware version and update it if necessary. Some older camera models possibly cannot be optimized for ONVIF operation. In order to prevent malfunctions as far as possible, we recommend having installed the latest firmware for your ONVIF devices. Network restrictions may be another reason for the automatic detection not working. In such a case, directly enter the IP address of the ONVIF device into the device address field and click <Choose>. |
|
Protocol
Supported protocols are HTTP and HTTPS. A valid certificate is required to use HTTPS. If the certificate is invalid or has yet to be added, the error message “Invalid certificate or TLS version” will be displayed.
For information on creating and managing certificates, see chapter Certificates.
Login name, password
If user credentials are required for camera access, then enable the selection field "Authentication required" in the "Device authentication" area and enter user name and password.
Afterwards, click <Connect>.
Video configuration

The connection with the device will be established.
In the "Onvif profile" section, the ONVIF profiles available and supported by ibaCapture (H.264, H.265, MPEG-4) are now shown in the drop-down list. You find other profiles than the ONVIF profile in the wizard for editing profiles.
Select an ONVIF profile to use for recording.
Note |
|
|---|---|
|
ibaCapture supports only finite GOP sizes. Some devices, such as the BOSCH VIP X1600 Encoder, are preset by the manufacturer to an infinite GOP size (value = 0) and key frames are sent on demand. You need to change this default value to a value >0 before you enable the configuration in ibaCapture. You can change this value either in the web interface of the device or in the profile editor within ibaCapture. |
|
Note |
|
|---|---|
|
The video encoders of some cameras allow setting the frame structure. There are values like “IP” or “IBP”. For ibaCapture it is recommended to use only structures without “B” frames. |
|
ONVIF profile
The ONVIF profile is a combination of the source profile (video source) and the encoder profile (video encoder).
The configuration of the source profile is determined by the properties of the ONVIF device. A camera generally has only one source profile. Other devices, such as analog IP encoders, can provide several video sources. Depending on the equipment, the available inputs can be selected via the source profiles.
The configuration of the encoder profile determines the way the video stream is encoded within the camera. These settings are usually made via the web interface of the camera/device. This includes parameters such as coding (H.264, H.265, MPEG-4), resolution, quality, GOP size, frame rate and bit rate. Different encoding configurations may help you to optimize videos with regard to purpose or way of transmission.
The ONVIF profiles can be adjusted to individual requirements.
Editing ONVIF profiles
For editing an ONVIF profile, you first need to ensure that the user set in the "device authentication" area (see above) has the user rights required for changes in the ONVIF profiles. If this is not the case, an error message will appear later at the corresponding step.

-
Click Manage Profiles in the ribbon
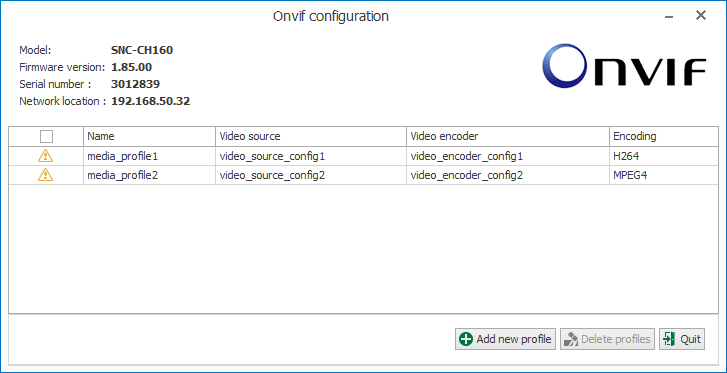
 . The assistant opens showing a list of available ONVIF profiles.
The available ONVIF profiles are presented in a table indicating name, source profile, encoder profile and type of video coding. If the option "Show only supported profiles" is checked, the list contains only those profiles supported by ibaCapture. ONVIF profiles can be added or removed. It is not possible to change existing ONVIF profiles. In order to adjust the video coding, the encoder profile can be modified.
-
Press the <Add new profile> button A new ONVIF profile is created on the basis of the last selected profile. The assistant will guide you through the next steps.

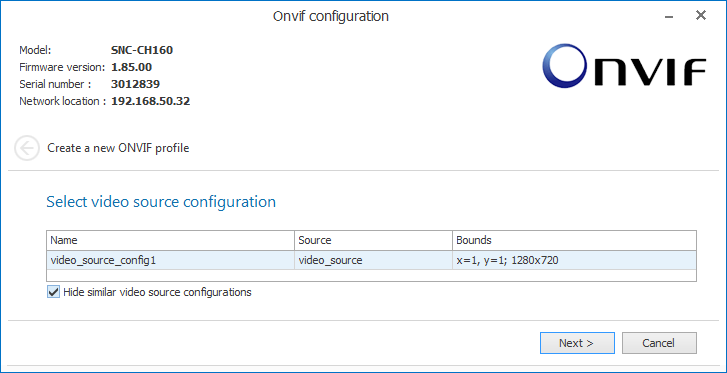
Selection of the video source configuration
-
First, select a source profile. The video sources are permanently stored in the respective ONVIF device and cannot be changed. If the option "Hide similar video source configurations" is checked, the assistant attempts to reasonably narrow down the available video sources, e.g. when the same video source is listed multiple times. A camera usually has only one video source. Afterwards, click <Next>.
-
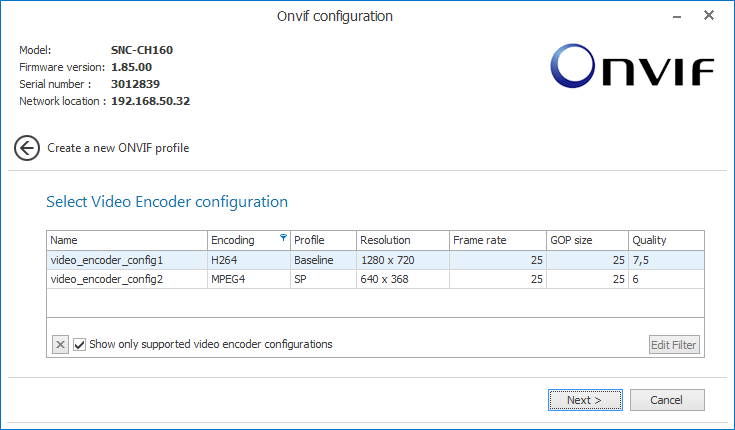
Select the encoder profile in the next step. The encoder profiles are stored in the device. Select the desired profile and click <Next>. If none of the offered encoder profiles meets your requirements, you can change an existing profile. Hereto, refer to the next chapter.
-
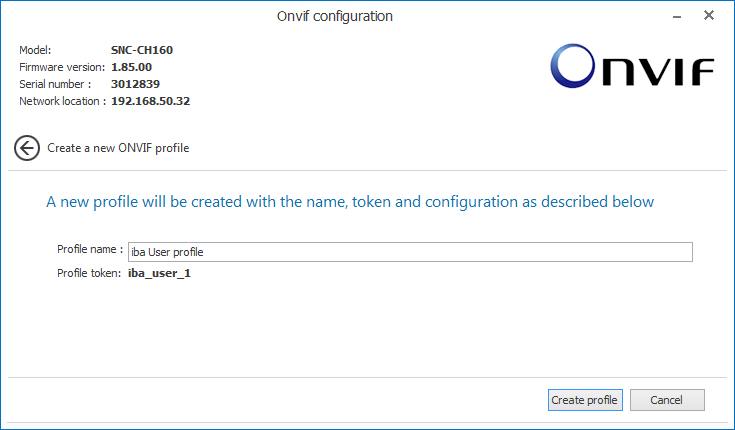
In the third step, you confirm your selection. The properties of the profile will be shown again. Enter a name for your new ONVIF profile. The token at the end is an internal ID for the profile and will be assigned automatically. Complete the creation of the new profile by pressing <Create profile>.


Editing of the video encoder configuration
In contrast to the video source configuration, you have the opportunity to modify
the encoder configuration. For this purpose, click Manage Encoders
 in the ribbon.
-
In order to change an existing video encoder configuration, click on the aforementioned button. The dialog for selecting the configuration to be modified opens.
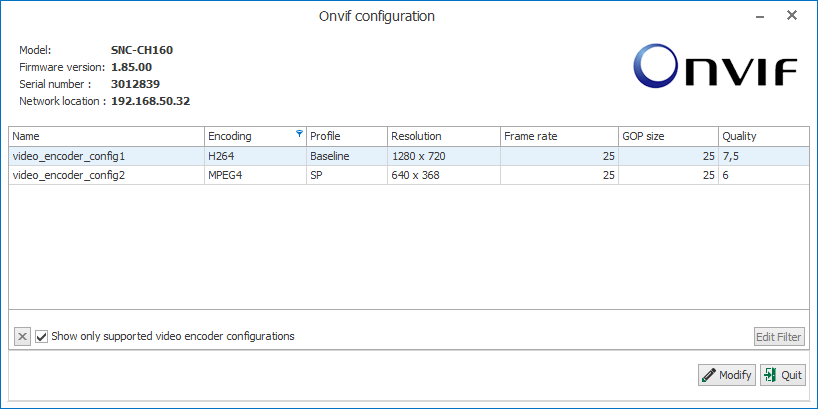
-
Click on the configuration to be modified and press <Modify>.
-
In the next step of the encoder configuration, you adjust the properties.
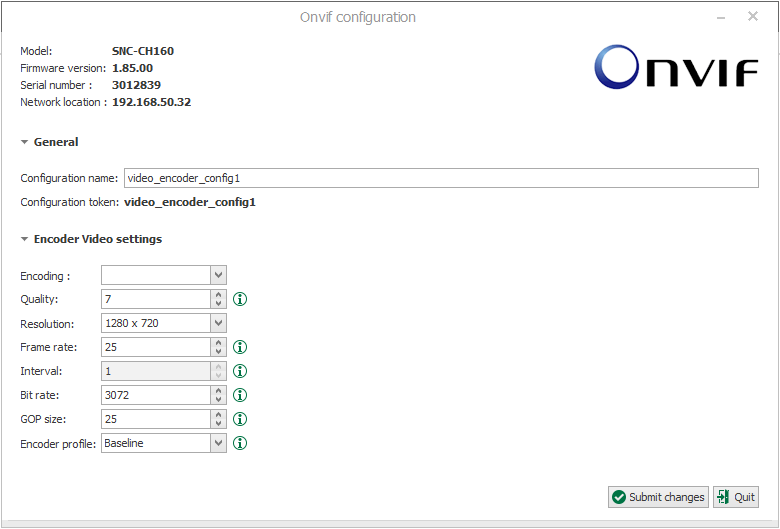
- select the coding. (ibaCapture supports only H.264, H.265 or MPEG-4) - select or change the quality, resolution, frame rate, encoding interval and bit rate. - please ensure to enter a value greater than 0 into the GOP size field. - encoder profiles are not always available. You will receive a quick info on the individual parameters when you move the mouse over the icon.

-
If the modified configuration is not to replace the original, you can enter a new name for the configuration in this dialog. It will then be added to the list of available encoder configurations.
-
Confirm the settings with <Submit changes>.


Caution! |
|
|---|---|
|
All changes you make to the video profiles and video encoder configurations are permanent. They will remain even after a restart of the device. Therefore, be careful when making changes, especially when removing profiles. |
|
You will find additional device- and manufacturer-specific notes on the use of ONVIF compatible devices in the chapter Supported cameras.