Discontinued
-
32-bit systems are no longer supported.
-
Stemmer Imaging CVB Image Manager SDK is no longer supported with GigE Vision cameras.
The following new features and improvements are available in ibaCapture starting with version 5.7.
Support for LAND Ametek thermal cameras
Starting with version 5.7.0, ibaCapture also supports thermal cameras from LAND Ametek.
To configure LAND Ametek thermal cameras, you will need the IMAGEPro V2 software from LAND Ametek.
You can use IMAGEPro V2 to configure the measurement areas and color settings for the temperature display, for example. You can then import the configuration files exported here into ibaCapture.
In the Measurement areas section, load the configuration file for measurement areas (*.landroi). For each measurement area, you can show or hide the hotspot and coldspot temperatures and define an emissivity .per measurement area
In the IMAGEPro V2 configuration section, load the configuration file (*.landconfig) for camera settings.
In the Color palette section, load the configuration file for the temperature display's color settings (*.paletteconfig).

See chapter LAND Ametek thermal cameras
Configuring Optris thermal cameras
ibaCapture supports Optris thermal camera SDK to support all Optris camera models.
Multiple measurement areas can now be defined for Optris thermal cameras. For each measurement area, you can show or hide the hotspot and coldspot temperatures and define an emissivity.

See chapter Optris thermal cameras
Display settings for thermal cameras
The following settings are the same for thermal cameras from Optris and LAND Ametek.
You can choose Celsius, Kelvin, or Fahrenheit as the temperature unit. Additional display options include a reference color scale for temperature and the hotspot/coldspot temperatures for the entire area.

Display of thermal cameras

Version 5.7 offers the following display options:
-
Display of a reference color scale for temperature values
-
Display all measurement areas
-
Display of the hotspot, coldspot, and average temperatures for each measurement area as well as for the entire area. You can choose where to display the temperature values: top, bottom, right, left, or center
Advanced control of thermal cameras with ibaPDA
The following features are now supported:
-
The camera motor focus can be adjusted using ibaPDA signals
-
The automatic camera shutter can be disabled using an ibaPDA signal
-
The camera shutter can be triggered manually using an ibaPDA signal
Procedure
-
Go to the Outputs tab in the I/O manager.
-
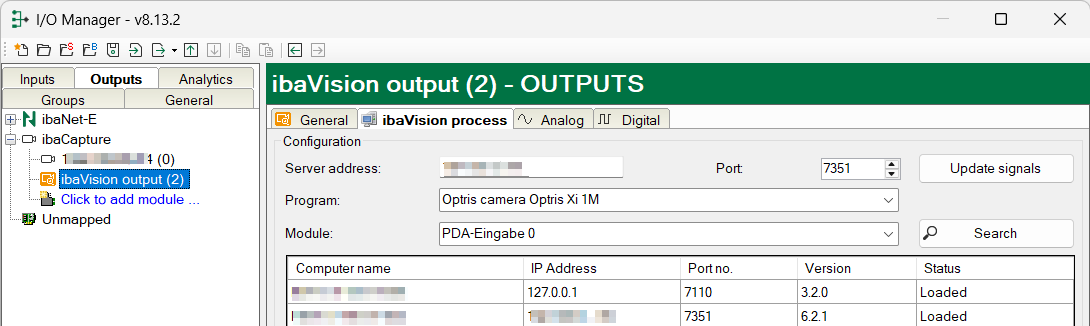
Create an ibaVision Output module under the ibaCapture interface.
-
Enter the server address and port number 7351. The other fields are filled in automatically.
-
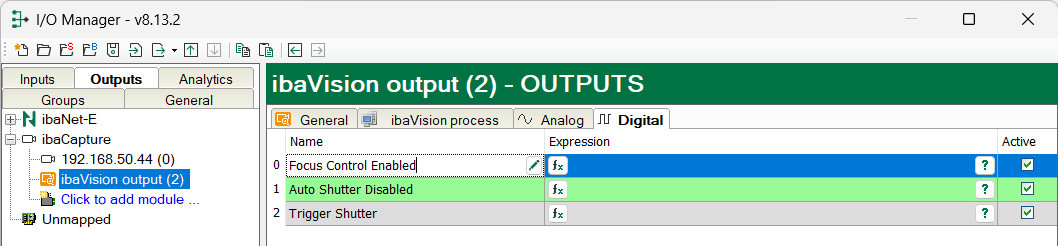
The signals for controlling the thermal cameras appear in the Analog and Digital tabs.

-
With ibaQPanel , you can control the thermal cameras using the signals.
-
To do this, create the appropriate signals in an ibaQPanel input module. You can find the ibaQPanel input module in the Analytics tab, under the Virtual module.
-
You need 1 analog signal (Focus Position) and 3 digital signals (Focus Control Enabled, Auto Shutter Disabled, Trigger Shutter)
-
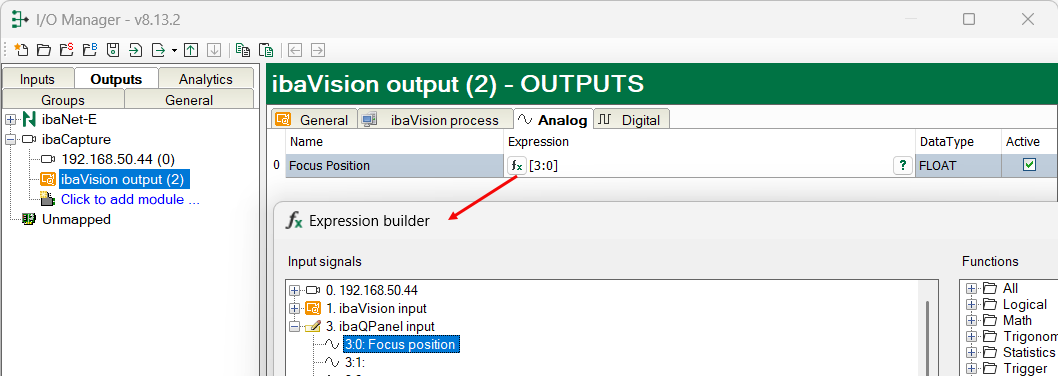
Switch to the ibaVision output module and link the signals to the ibaQPanel input signal.
-
Open the expression builder and select the appropriate signal for the 4 signals. Here you see the analog signal as an example.
-
Apply the configuration.
-
Add an ibaQPanel view. The following tools are necessary:
-
-
Silder: select the target signal Focus Position
-
Checkbox (2x): select the target signals Focus Control Enabled and Auto Shutter Disabled
-
Button: Select the command Pulse digital signal, select the digital signal Trigger Shutter
-


The following figure shows the view in ibaPDA: thermal image, temperature signals and control panel.

See chapter Controlling thermal cameras with ibaPDA
Improved user management
When a user is selected, all user groups are displayed in the list on the right. The user groups of which the user is a member are marked with a check mark. Membership in a user group can be changed at any time by checking or unchecking the box.

If a user group is selected, all configured users are displayed in the member list. Members of the user group are marked with a check mark. A user's membership in a user group can be changed at any time by checking or unchecking the box.

Changes can be confirmed by clicking <Apply user management>.
See chapter User management in ibaCapture
Additional improvements and changes
The alias for the ibaCapture server is now displayed in ibaManagementStudio .
The license information now also displays the WIBU ticket number.