According to standard IEC 61850-7-2, IEC 61850 devices can create COMTRADE files when a trigger occurs. The file module enables ibaPDA to download, rename and copy these files from an IEC 61850 device to a destination directory. You can configure the file module as sub module under an IEC 61850 device.
File module – Basic settings
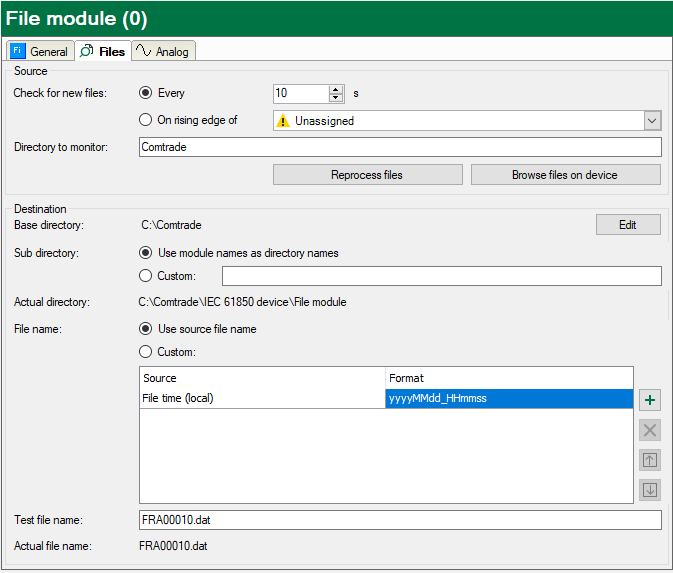
File module – Files tab
On this tab, you can make the settings for the file handling.
Source
Here you can set when a scan for new files should be performed. If you want to scan periodically, you can set the scan interval, given in seconds, here. Alternatively, you can trigger a scan by a rising edge of a trigger signal. The drop-down list offers all digital signals in the signal tree. Select the desired signal here. A reasonable choice is a signal which indicates when the file creation is finished on the IEC 61850 device, e.g. the RcdMade.stVal data attribute of the RDRE logical node.
Furthermore, enter the name of the directory to be monitored for new files on the IEC 61850 device.
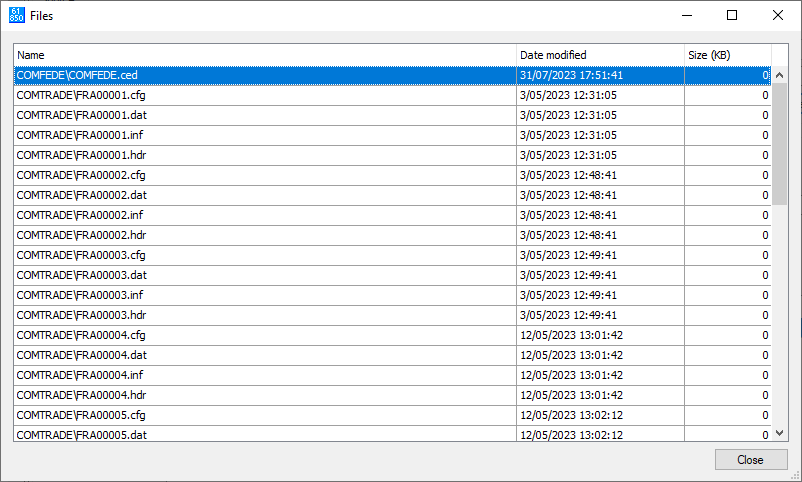
<Browse files on device> button
Use this button to get an overview of the current files on the device. This might look as follows:
<Reprocess files> button
If you click on this button then all files, which are available on the IEC 61850 device, will be processed again. This may be useful if you have changed the destination settings.
Destination
In the Destination section you set the directory where the files should be transferred to and how they should be named.
The path of the destination directory consists of two parts:
-
Base directoryThe directory as it is configured in the settings of the interface IEC 61850 Client, in the field IEC61850-7-2 files destination path. Click on the <Edit> button to get there directly.
-
Sub directoryThe name of the sub directory can be created from the module name or manually. Select the desired option and enter a directory name if needed. If you enter a relative directory name (e.g. Test) in the Custom field, then this directory will be created relatively to the base directory. If you enter a full path (e.g. C:\Test), then the base directory will be ignored. UNC-path entries are permitted.
The line Actual directory shows the name according to the settings.
The name of the source file or a customized name can be used for the destination file. You can assemble the customized name from different parts.
Use the table below to configure the file name.
Next to the table, there are buttons with the following features:
|
Add a new part to the file name. By clicking on this button you get a menu for selecting the desired information type (see below). |
|
|
Delete selected row. |
|
|
Move selected row up in sequence. The icon is not available (gray), if the operation is not possible. |
|
|
Move selected row down in sequence. The icon is not available (gray), if the operation is not possible. |
The sequence of the parts in the table from top to bottom is transferred to the file name from left to right. A later change of sequence in the table will respectively change the file name.
You can insert the following information into the file name:
|
Information |
Description |
|---|---|
|
File time (local) |
Inserts the local file time. Open the drop-down list in the Format column to select the preferred time format. File time (local) is set by default in the first row. After you have added more information you can shift file time (local) to another position or delete it. |
|
File time (UTC) |
Inserts the file time as UTC value. Open the drop-down list in the Format column to select the preferred time format. |
|
Original file name |
Inserts a part of or the complete file name of the source file. A little drop-down list in the Format column helps. For single characters enter a single number (index). “0” refers to the first character in the file name. For multiple consecutive characters enter a range. “0-2”, for example, will use the first three characters of the file name. In order to use the complete file name select Full in the drop-down list. |
|
Static text |
Any text, which remains unchanged. Allowed are all characters, which can be used in file names. |
In order to check how the final file name would look like, you can enter a file name as it would be on the IEC 61850 device, in the Test file name field. The line Actual file name then shows the result.
File module – Analog tab
The module has two diagnostic signals:
-
Number of files downloadedThis is a 32 bit integer counter (DWORD), that is incremented with each downloaded file.
-
Last retrieved fileThis is a text signal (STRING) containing the full name of the last file, which was saved in the destination directory.
The signals and their actual values are shown in the Analog tab of the IEC 61850 device module.
Log file
The log file of the IEC 61850 client interface will contain entries for each file that is transferred and for any error that might have occurred.
Click on the <Open log file> button in the IEC 61850 client interface dialog to view the log file.


