The description applies to the following types of data stores:
-
DB/Cloud timebased
-
Kafka cluster timebased
-
MQTT timebased and MQTT Sparkplug B
-
MindSphere timebased
-
InfluxDB timebased.
In the Trigger Mode node, you determine when data is recorded, here using the example of DB/Cloud timebased data store.

Start trigger
You initially choose whether you want to record continuously or initiated by a trigger.
Unconditional
Select this option to record data continuously. The recording starts immediately at the start of the measurement or when clicking the <GO> button.
Trigger on signal
If you want the trigger to fire on a measured signal or a virtual signal, you need to check Trigger on signal in the option field. In the fields next to this, define the properties of the trigger signal.
-
Field 1: Drop-down list for signal selection (available analog and digital signals)
-
Field 2: Drop-down list for selecting edges or levels
-
Field 3: Drop-down list for selecting the trigger level value given in the specific physical unit (field 3 is only enabled in case of analog trigger signals)
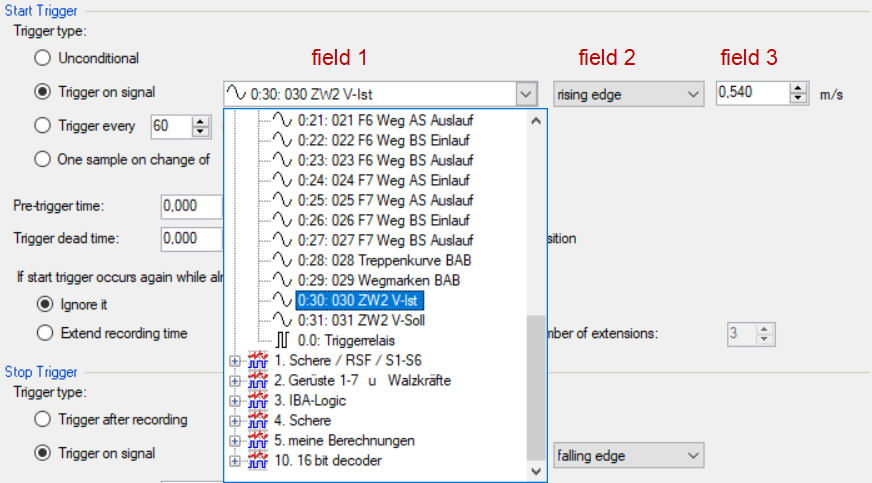
Both analog and digital signals can serve as triggers. Select the signal to be triggered via the signal tree in the selection list in field 1.
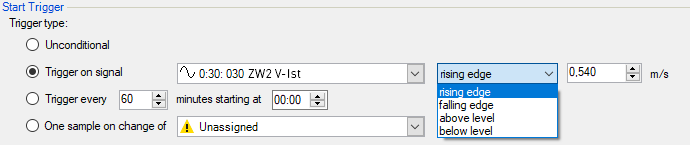
In fields 2 and 3 you can define the trigger event more specifically. These fields vary depending on whether the selected trigger signal is analog or digitalt.
-
For analog signals, you can choose between level or edge triggers including a predefined level (field 3).
-
For digital signals, you can choose between level or edge triggers including the 2 levels logical 0 (FALSE) and logical 1 (TRUE).

Trigger every …
If you want to use a start trigger always at a certain time regularly, you can check the Trigger every ... minutes starting at … option. Enter the period given in minutes, or select it from the input field. Value range is from 0 to 1440, which equals one day. Then enter or select the start time for the first trigger. Value range is from 00:00 to 23:59, which equals one day.
One sample on change of
When the value of the selected signal changes, a sample is recorded. The recording stops after one sample, until the next signal change is detected. A deadtime can be configured to determine a minimum amount of time between samples. Before the deadtime has elapsed, no new sample is recorded.
Pre-trigger time
You can configure a pre-trigger time and then the recording begins by the pre-trigger time before the trigger event. If the trigger condition is met, the incoming data is added to the data buffered during the pre-trigger time.
Trigger dead time
This property is available for the start triggers Trigger on signal, Trigger every … and One sample on change of. The trigger dead time determines the time of suppressing subsequent triggers after a trigger occurred.
If the dead time, for instance, is set to 5 seconds, all other triggers are ignored for the duration of 5 seconds after the first trigger occurrence.
Trigger at the start of the acquisition
If you want the recording to start immediately at acquisition start or as soon as you apply a new data storage configuration, select the Trigger on acquisition start option. If you do not enable this option, the recording only starts when the trigger is fired.
If start trigger occurs again while file is already recording, then
You can determine here what should happen if a new start trigger occurs while a recording is already running.
-
Ignore it: If you select this option, the system ignores any new start trigger during a running recording for as long as the stop trigger occurs
-
Extend recording time: If you select this option, the system extends the duration of the running recording upon occurrence of another start trigger during an ongoing recording. This occurs as often as set in the "Maximum number of extensions" field. If the max. number of extensions is reached, all subsequent start triggers are ignored. Of course, the recording is stopped immediately by any stop trigger.
Stop trigger
The settings for the stop trigger are made in the same way as those for the start trigger. Here, both analog and digital signals can also be used as triggers.
Trigger after recording of x hours x minutes x seconds
Here you can configure a time span according to which the recording is ended after the occurrence of the start trigger.
Trigger on signal
See explanation for start trigger above.
Post trigger time
You can configure a post trigger time and then the recording ends by the post trigger time after the stop trigger event.