In the “Trigger mode” node, you can configure the triggers that create the time period.

Two write modes are possible: Standard and tracking mode
-
Standard: Time periods are closed in the same order as they were opened (first in, first out)
-
Tracking: Time periods can be closed in any order. The time periods must be identifiable by a unique combination of info field values. Tracking mode is used when time periods must be assigned to specific product items. If there are several items in the production system, the stop trigger is not unique when an item leaves the production system. Tracking mode allows assignment of stop triggers to product IDs and thus ensures that the correct time period is closed.
Trigger settings in standard mode
Start trigger
Trigger on signal
If you want the trigger to fire on a measured signal or a virtual signal, you need to check Trigger on signal in the option field. In the fields next to this, define the properties of the trigger signal.
-
Field 1: Drop-down list for signal selection (available analog and digital signals)
-
Field 2: Drop-down list for selecting edges or levels
-
Field 3: Drop-down list for selecting the trigger level value given in the specific physical unit (field 3 is only enabled in case of analog trigger signals)
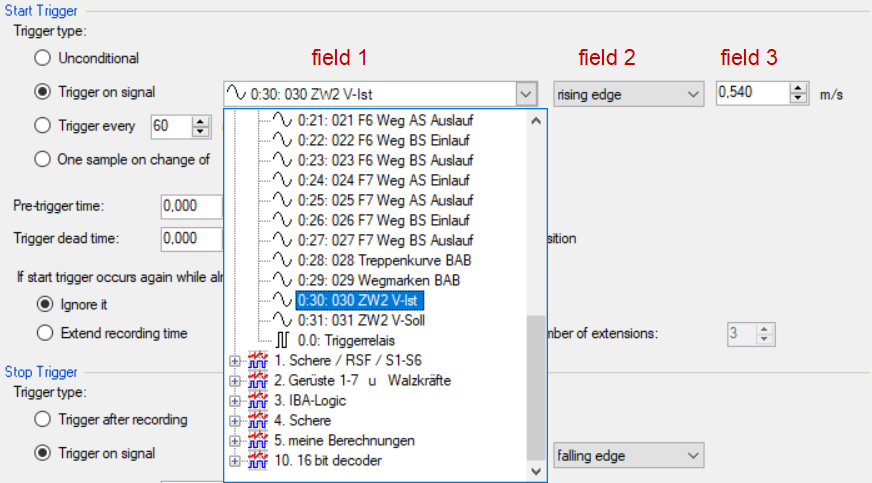
Both analog and digital signals can serve as triggers. Select the signal to be triggered via the signal tree in the selection list in field 1.
In fields 2 and 3 you can define the trigger event more specifically. These fields vary depending on whether the selected trigger signal is analog or digitalt.
-
For analog signals, you can choose between level or edge triggers including a predefined level (field 3).

-
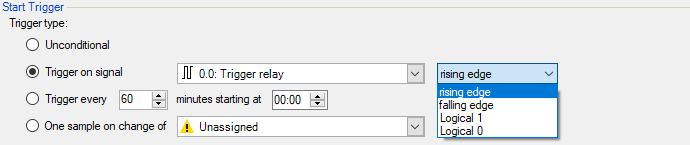
For digital signals, you can choose between level or edge triggers including the 2 levels logical 0 (FALSE) and logical 1 (TRUE).
Trigger every …
If you want to use a start trigger always at a certain time regularly, you can check the Trigger every ... minutes starting at … option. Enter the period given in minutes, or select it from the input field. Value range is from 0 to 1440, which equals one day. Then enter or select the start time for the first trigger. Value range is from 00:00 to 23:59, which equals one day.
Use start trigger pool
Enable this option if you want to use trigger signals from the start trigger pool. You can find further information about the trigger pool in the ibaPDA manual, part 5, Data storage.
Pre-trigger time
You can configure a pre-trigger time, which means that the time period begins before the trigger event by the pre-trigger time. The start time is then the trigger time minus the pre-trigger time. If the trigger condition is met, the incoming data is added to the data buffered during the pre-trigger time.
Trigger dead time
This property is available for the Trigger on signal and Trigger every... start triggers. The trigger dead time specifies the time of suppressing subsequent triggers after a trigger occurred. For example, if the dead time is set to 5 seconds, all other triggers are ignored for the duration of 5 seconds after the first trigger occurrence.
Trigger at the start of the acquisition
If you want the time period to start immediately at the start of the acquisition, or as soon as a new data storage configuration has been applied, the Trigger at the start of the acquisition option must also be enabled. If you do not enable this option, the time period does not start until the trigger fires.
If a start trigger occurs again while a time period is already active, then:
You can specify what you want to happen if a new start trigger occurs while a time period is already active:
-
Ignore it: If this option is enabled, the system ignores every new start trigger. The current time period is continued.
-
Start overlapped: If this option is enabled, a further time period is started and the current one is not closed. In the Maximum number of overlapped time periods field, you can set how many time periods can be opened at the same time.
-
Extend recording time: If this option is enabled, the maximum length of the current time period is increased. It is increased by the configured Maximum time period length in the stop trigger section. In the Maximum number of extensions on a single time period field, you can configure how often the maximum length can be increased.
-
Start new time period: If this option is enabled, the current time period is closed and a new time period is started.
Stop trigger
In standard mode, a stop trigger always relates to the oldest open time period. If acquisition is stopped or a new data acquisition configuration is applied, all open time periods are automatically closed.
The settings for the stop trigger are made in the same way as for the start trigger. As before, both analog and digital signals can be used as the trigger.
Trigger on reception of text signal
The stop trigger is initiated by reception of the text signal selected in the field nearby. The content of the text signal is not relevant for the trigger function.
Post-trigger time
You can configure a post-trigger time, which means that the time period ends after the trigger event by the post-trigger time.
Maximum time period length
If no stop trigger is fired, the time period is automatically closed when it reaches the maximum length.
If Unconditional is selected for the stop trigger, the time period always has the maximum length.
Trigger settings in tracking mode
Start trigger
The settings for the start trigger are the same as those in standard mode.
Stop trigger
The settings for trigger type, post-trigger time and maximum time period length correspond to those in standard mode.
However, in tracking mode the stop trigger relates not to the oldest time period but to the time period that corresponds to the current ID.
The ID of a time period is defined by one or more info fields. You can configure which info fields define the ID in the table for identification of the time period. To add the info field to the ID, assign a signal and enable it by checking it. The signals are acquired at the time of the stop trigger and ibaPDA then queries the time period store to identify the times whose ID info fields correspond to the signal values.
The query only includes time periods whose start time is less than the maximum length of the time period before the stop trigger. If ibaPDA finds several matching time periods, none of them are closed. A warning is created in the event log.
You can configure how ibaPDA behaves if a stop trigger occurs and the matching time period is already closed. You can choose between
-
Ignore it: The end time of the corresponding time period is not changed
-
Overwrite the previous end time with the new end time: The end time of the corresponding time period is changed
In tracking mode, open time periods are not automatically closed if acquisition is stopped or a new data storage configuration is applied. Time periods are only closed by a stop trigger. If Unconditional is selected, another application must close the time period.