Note |
|
|---|---|
|
Only one source can write to an HD store. When several HD data stores (from one or more ibaPDAsystems) write on an ibaHD server, an HD store has to be created for every HD data store. |
|
Clicking on <Configure HD stores...> opens the configuration dialog for the stores of the ibaHD-Server. You get the same dialog when you click on the <Configure> button in the data storage configuration of ibaPDA.
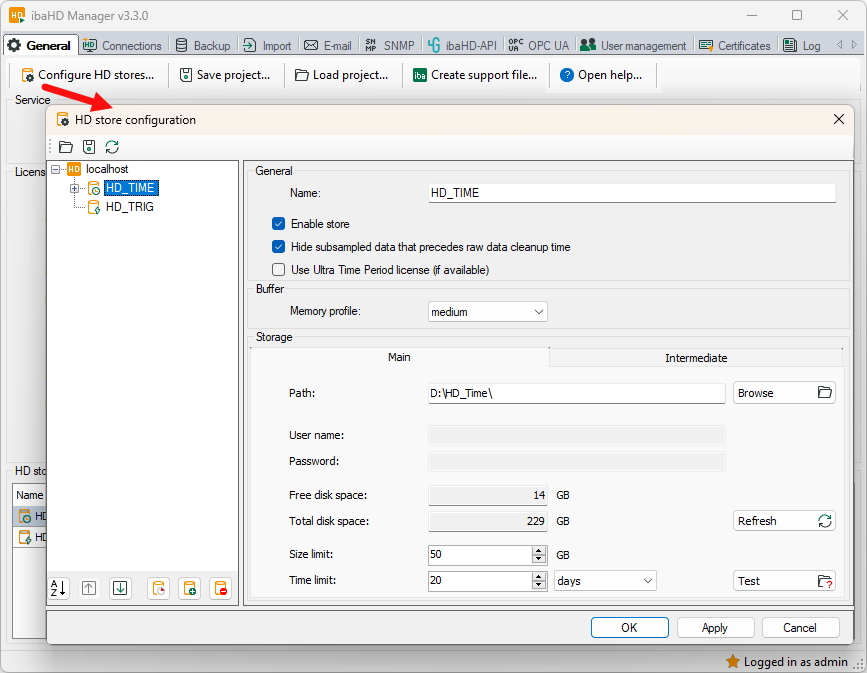
The already configured HD data stores are displayed in the tree view on the left. During the first installation, the tree view is empty.
The buttons below the tree view do the following:
|
A time period is added (only possible under a time store) |
|
|
An HD store is added. Use the drop-down menu to select the type of store you want to add. |
|
|
Selected HD store is removed from the tree view. |
|
 |
HD stores are sorted alphanumerically. |
|
Selected HD store is moved up one position in the tree view. |
|
|
Selected HD store is moved down one position in the tree view. |
Note |
|
|---|---|
|
The HD data store type in ibaPDA and the HD store type on the ibaHD server always have to match.
|
|
Note |
|
|---|---|
|
A separate license is required for a time period store, see Licenses. |
|
General
Name
Here you can assign a name for an HD store
Enable storage
If you want to use the storage, this option must be enabled. Enabled stores are marked in the tree structure with a yellow icon. Disabled stores are marked with a gray icon.
No read or write access is possible with a disabled store. It is also not possible to attach or restore backups.
Note |
|
|---|---|
|
If you remove the dongle, all stores are disabled. If you reattach the dongle, all stores are automatically released again. |
|
Hide summarized data whose corresponding raw data has already been deleted
This option is only available for time-based stores. If you enable this option, then aggregated values of the higher aggregation levels will no longer be shown if the raw data that served as the basis for calculating these consolidated values was completely or partially deleted. The reason for the lack of raw data may be an automatic cleanup, for example.
If you do not enable this function, then the summarized values will also be shown if the underlying raw data is missing. A drill down in the display then shows incomplete or missing curves.
Use Ultra Time Period license (if available)
Activate this option if one of the existing Ultra Time Period licenses is to be used for the time periods in this HD store instead of a single license.
Buffer
For time and length-based HD stores, it is possible to select a memory profile for the data buffer.

The memory profile determines the size of the (main) memory which, as buffer, is reserved for the data acquisition. The buffer size is directly proportional to the number of the IO operations, which are necessary for writing data from the buffer in the HD store, i.e. on the hard disk. The performance during the reading of data from the HD store (e.g. by ibaAnalyzer or ibaPDA) will also be influenced in the process.
If the buffer gets reduced, the transmission of the data from the buffer to the hard disk will occur in smaller, but more data blocks.
If the buffer gets enlarged, the transmission of the data from the buffer to the hard disk will be carried out in larger, but less data blocks.
Some limitations apply here:
-
If the ibaHD-Server is installed on a 32-bit operating system, the memory profile for all HD stores will automatically be set to “low.”
-
The same applies to the 64-bit systems, which are equipped with less than 2 GB RAM.
-
If ibaHD-Server is installed on a 64-bit operating system with less than 4 GB RAM. The maximum possible memory profile is “medium.”
General settings recommendations:
Select a higher memory profile if few signals with a high sample rate are acquired.
Select a lower memory profile if many signals with a low sample rate are acquired.
Exact information cannot be given here, as the performance is influenced by many factors:
-
System hardware
-
Number of simultaneous acquisitions
-
Number of the acquired signals
-
Sample rate of the acquired signals
-
Data consolidation during the acquisition
-
Number of the reading clients
|
Reference value for memory profile (depends on operating system and RAM) |
|
|---|---|
|
x86 |
low |
|
x64: < 2 GB RAM |
low |
|
x64: < 4 GB RAM |
medium |
|
x64: ≥ 4 GB RAM |
high |
Storage locations
Since version 2.1 of ibaHD-Server, it is possible to optionally use a cache in addition to the primary memory. The two tabs primary memory and cache are available for configuring both storage locations. The primary memory is generally configured on hard disc drives, because this type of storage is ideal for long-term storage of large amounts of data.
The cache, on the other hand, is designed for SSD disks and is used to temporarily store newly acquired data. In this way, the data volume can be reorganized for an optimal read performance before the data is written on the primary memory’s hard disk.
Using the cache can significantly reduce the system’s response time, especially if large data volumes are requested by the HD clients while acquisition is in progress or data is being imported into the store.
Also observe the notes in the appendix, Tips for main and intermediate storage.
Primary memory
Path
Here you select the directory for the HD data store. By means of the button <Search> you get to the directory structure of your ibaHD-Server.
User name/password
If the directory is on an external computer, i.e. not on the ibaHD-Server computer and a user name is required, please enter the user name and the password.
Free / total disk memory
The totally available and free memory space referred to the partition of the entered path is displayed. In doing so, a memory space possibly already assigned to other HD stores cannot be taken into consideration.
Use the <Update> button to determine the values for free and total memory capacity.
Tip |
|
|---|---|
|
To minimize the network load, the path for the HD data store should always refer to the local hard disk of the ibaHD-Server computer. |
|
Size limit
If all signal data exceeds the memory limit set here for the HD data store, the oldest signal data is overwritten.
Time limit
If the signal data is older than the time set here, it will be deleted.
Intermediate
Use intermediate storage
Enable this option if you want to use the cache.
Path
Here you select the directory on a SSD disk for the cache. Use the <Browse> button to access the computer’s directory structure.
The other settings and buttons are the same as with the primary memory.
Note |
|
|---|---|
|
The storage capacity limit for the intermediate storage must not be larger than the size of the main storage of the respective HD store.. For time and length-based stores that are less than 500 GB, the size of the intermediate storage must be at least 10 % of the main storage of the respective HD store. If the main memory of the HD store is larger than 500 GB, 50 GB are recommended for the size of intermediate storage. For detailed information see chapter Tips for main and intermediate storage. The storage system provides that the data segments that have not yet been completed are stored in the intermediate storage. If the segments are registered as completed, they are moved to the main storage of the HD store. Due to this storage method, the occupied storage space remains almost constant after a phase of growth. In exceptional cases, the size of the intermediate storage may exceed 50 GB. Then more space must be allocated on the medium for the intermediate storage. |
|
Note |
|
|---|---|
|
In addition to the buffer in the main memory, the cache also works as a buffer when the hard disk drive is too busy to be able to execute all I/O operations. In the event that the cache overflows, the active acquisition to the HD server is interrupted and other write accesses to the store are rejected until half of the cache has been emptied into the primary memory. The writing clients receive a message with a note about the cache overflow. See also chapter Tips for main and intermediate storage. |
|
Close the configuration
Click on <OK> or <Apply> to apply the new configuration. The new configuration is to be confirmed or any error messages are displayed in a pop-up window.
