In any HD trend representation, you can always add one or more notes. Notes are saved in an event-based HD store as manually added events and are shown in the event table.
Notes are intended to document an observation or a remark in due time and to save them in the HD record.
In addition, each note can be linked with an attachment. An attachment can be any file, such as an image file (screenshot) or a document (Word, PDF, etc.).
To facilitate use on the one hand and to optimize the management of notes in the HD server on the other, notes (once created) can be saved in a tree structure. This allows you to build a library of types or categories of notes that you can then always reuse. You can configure the notes by topic, for example (“failure,” “quality,” “mechanics,” “production,” etc.).To enter a note in the event table, you then have to select the appropriate configured notes (“topic”) from the drop-down list and complete them with a current message that you enter by hand.
To create a note, proceed as follows.
-
During the ongoing acquisition, click on the note icon in the toolbar of the HD trend view.

Clicking switches the trend display to pause mode and a yellow marker appears that is attached to the cross-hair cursor.
-
Use the mouse to navigate to the time in the trend graph where you want to paste the note and click.
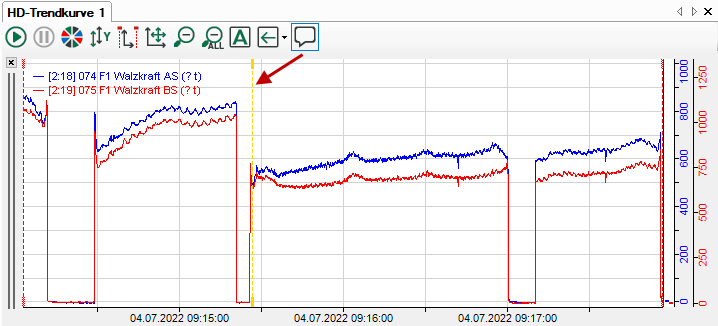
The "Create annotation" dialog opens.
-
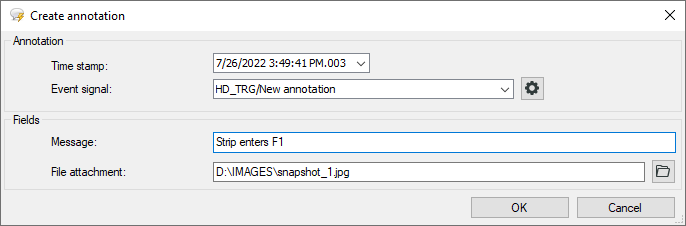
If necessary, correct the time stamp of the note.
-
The last chosen note is displayed in the event signal field. If annotations have already been configured, you can select an appropriate annotation from the drop-down list in order to adopt event names and comments for the current annotation. If you have not yet configured any annotations, you see "Events/ New annotation". In this case, please read on in step 8 first.
-
If you have selected a note, insert plaint text as a message first. This text will appear later in the event table both in the message column as well as in the note column.
-
If you want to add an additional document (image file, report file, text file or Office file) to the note, you can enter the complete path to the respective file or select it by browser in the file attachment field. This path will be shown later in the Attachment column in the event table.
-
Exit the dialog with <OK>. The new annotation will be sorted into the event table with the right time.
-
If you have not configured any notes before, click on the gear icon in the “Create note” dialog. The dialog "’HD-Server computer‘ annotation signal configuration" opens up.
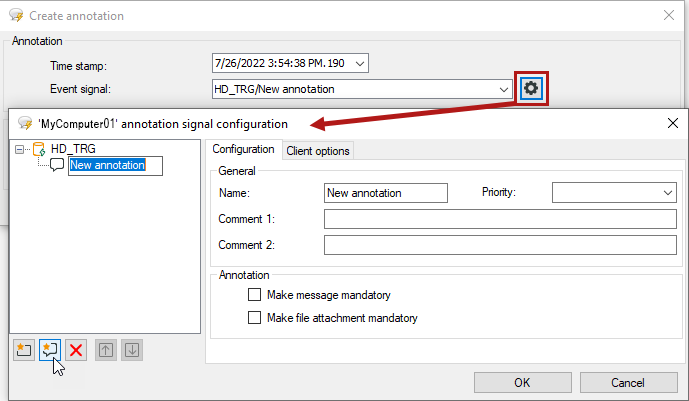
The tree structure shows all of the HD stores for events that exist on the respective HD server.
-
In this tree structure, you can now create any type of note and arrange these in a folder structure. To do this, use the following symbol keys;

New folder

New note

Remove

Move up

Move down
-
If you configure a new note, give it a meaningful understandable name.
-
If necessary, select a degree of priority. In the event table, the note, like other events, will be handled with the same degree of priority, such as when filtering.
-
IF necessary, enter up to two comments. The comments are visible in the event table if the columnscomment 1 and comment 2 are enabled.
-
If you want to make sure that when entering a note in the trend graph the entry of a message is not forgotten, enable the option Message required. The dialog for creating a note then cannot be closed if the message field is empty.
-
If you want to make sure that when entering a note in the trend graph the entry or selection of an attachment is not forgotten, enable the option ‘File attachment required.’ The dialog for creating a note then cannot be closed if the file attachment field is empty.
-
Exit the dialog with <OK>. You will return to the “Create annotation” dialog and can now select the appropriate note from the “Event signal” drop-down list. Continue with step 5.


