To create and configure a job in ibaDatCoordinator, proceed as follows.
-
First, decide what type of job you need, see Overview of job types.
-
Click on the corresponding link in the tree structure:
-
Add DAT file job
-
Add scheduled HD job
-
Add scheduled job
-
Add event job
-
Add time period job
-
Add one-time job
-
Add external file job
-
-
Click on the newly added job node.
In the display and configuration area, the basic settings for this job are shown.
-
Set a name for the job.
The default name is "New job". For better comprehensibility, iba recommends choosing an application-specific name.
-
Add one or more tasks to the job, see Configuring a task.
Please note that the tasks will later be processed in the order in which they are listed in the job tree.
-
In the Notifications section, specify whether email notifications should be sent whenever the job runs or at specific intervals. You can further specify the settings later for each subordinate task.
Select the account for the sender and enter the recipient's email address.
For more information on configuring email accounts, see Settings – Email accounts.
-
Configure the job-specific settings, see
-
Add one or more tasks to the job, see Configuring a task.
Please note that the tasks will later be processed in the order in which they are listed in the job tree.
-
If you want to undo the configuration changes, click
 .
.The most recently saved and currently active configuration will be downloaded and applied.
-
To apply changes to the job configuration, click
 .
.Please note that the button for individual jobs is only active while the job is running. Alternatively, apply the configuration changes to all jobs by clicking the same button above the navigation menu.
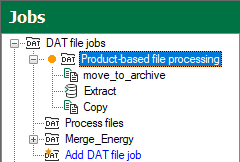
Jobs with unsaved configuration changes are marked with an orange dot in the job tree:
ibaDatCoordinator validates the configuration and displays the result in a window.
