Learn how to establish a connection between ibaCMC and ibaDAQ and how to load the configuration into the device.
Please note, that the computer you are working on to do this configuration should have a network connection to the ibaDAQ device and that the ibaPDA client app should be installed. Best way is to do the configuration on the ibaCMC computer.
Establish the connection
-
Open the plant configuration in ibaCMC and drag the desired ibaDAQ CMU into the plant configuration window.
-
Select the General tab and click on the copy-icon at the end of the CM device GUID field. Thus, the GUID is copied to the clipboard.
-
Start ibaPDA client on the computer and connect to the ibaPDA server on the ibaDAQ device.
-
Open the I/O Manager and navigate to General - ibaCMC. Please note, that the ibaCMC node is only visible if the ibaCMS-One-Sensor license is enabled in ibaPDA on the device.
-
Enter the following data in the area ibaCMC server connection:
-
Server address (of the ibaCMC server) like
https://IP address or host name -
Server port (default 443)
-
CM device GUID (paste from clipboard)
-
-
Click on the <Test connection> button and ibaPDA will establish the connection to ibaCMC. If the connection has been established successfully you will get a corresponding message.
Load the configuration
ibaPDA offers an automatic and a manual method to load a configuration, which was created by ibaCMC, into the device.
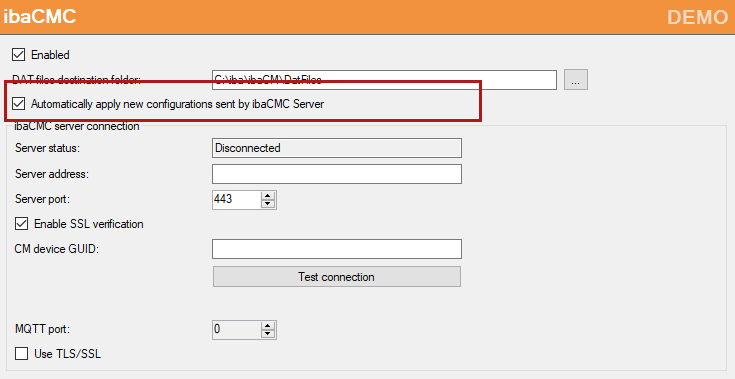
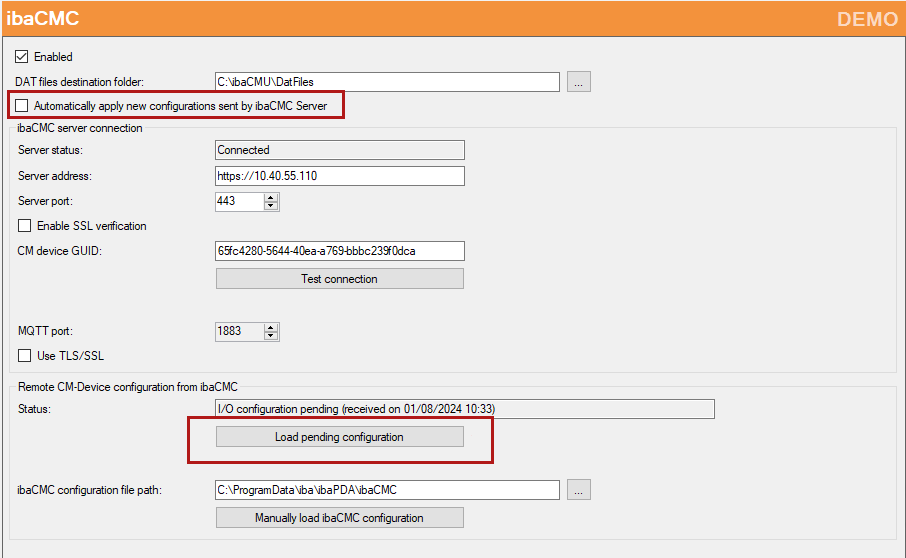
In the I/O Manger of ibaPDA, node ibaCMC, there is the option Automatically apply new configurations sent by ibaCMC Server.
If you enable this option, the pending configuration will be automatically applied in the device when the configuration is downloaded from ibaCMC to ibaPDA. No interaction is required in ibaPDA.
If you disable this option, the button <Load pending configuration> in the Remote CM-Device configuration from ibaCMC area below will become available, in case there is a configuration still pending. The configuration will only be loaded, if you press this button first, followed by <OK> or <Apply>.
Description of the other settings
-
Enabled: Enables the connection to ibaCMC
-
DAT files destination folder: Intermediate storage for DAT snapshot files and indicator files
-
Server status: ibaPDA is connected/not connected to ibaCMC
-
Server address: Address of the ibaCMC server. Here, you can enter the host name or the IP address; entry form:
https://IP address or host name -
Server port: ibaCMC server port
-
Enable SSL verification: Enables the verification of the SSL certificate
-
CM-Device GUID: CM-Device GUID of the device. You find this in ibaCMC, in the CMU configuration, General tab.
-
MQTT port: Specifies the port used for MQTT; automatically set
-
Use TLS/SSL: Specifies whether SSL is enabled; automatically set
Note |
|
|---|---|
|
The port of the ibaCMC server and the MQTT port on the ibaCMC server must be allowed in the firewall! |
|

