You can use the watch view to monitor the values of any signal in a tabular manner. Numeric signals as well as text signals are supported. Signals of an ibaPDA server and of an ibaHD-Server can be displayed. You may open and position as many watch views as you like. The watch view is also available in ibaQPanel.
You can open the watch view either via the toolbar button![]() or by using the View – Add view – Add Watch view menu.
or by using the View – Add view – Add Watch view menu.
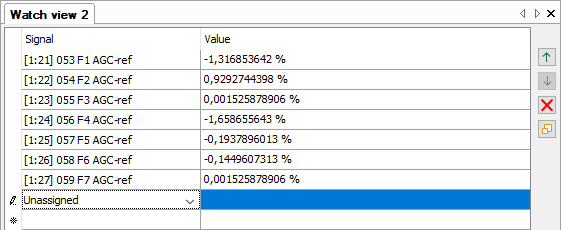
You can drag one or more signals out of the ibaPDA or ibaHD-Server signal tree and drop them into the watch view. The number of rows is adapted automatically. Alternatively, you may add signals to the view by clicking on the drop-down icon in the Signal column and select the signals in the respective signal tree there.
With the buttons on the right margin of the view you can move or delete the rows. You can select multiple lines by mouseclick + <Ctrl> or mouseclick + <Shift>.
|
|
Move the selected row(s) up by one position. |
|
|
Move the selected row(s) down by one position. |
|
|
Remove the selected row(s) from the view. |
|
|
Group the selected row(s) in a separate section. |
With the lowest button Assign rows to a section you can organize the view into two or more sections.
Select one or more rows and click on the button![]() .
.
A dialog pops up where you can either enter a name for a new section or select an existing section to assign the signals.
Moving the rows with the control buttons only work within the section. If you want to assign a row to another section, use the button Assign rows to a section .
If you select a section, the control buttons apply to the entire section. Thus, you can move or delete a section. If you delete a section, all rows assigned to this section will be deleted too. If you want to avoid this, you should first select the rows inside the section and assign them to another section.
You can rename a section by making a right-click on the section title and selecting Rename... in the context menu.
Properties
You can open the properties of the watch window by making a right-click anywhere in the watch window and choosing Properties... in the context menu.
The following properties are available:
-
Numeric value formatting: Beside the automatic formatting you have the possibility to customize the formatting of numeric values in terms of number of digits before and after the decimal point as well as the display of positive values.
-
User interaction: If you enable this option, users can change signals in the view (add, replace, delete) even if they don't have the right to change layouts but the right to interact with views. If you disable this option, users must have the right to change layouts in order to change signals in the view.
Special function for signal mapper signals
Basically, signal mapper signals behave like all other signals. However, if no source signals are mapped to these signals, they are handled slightly different in the watch view.
If the watch view contains signal mapper signals without having assigned source signals, another button with a lightning symbol and two more columns will appear automatically.
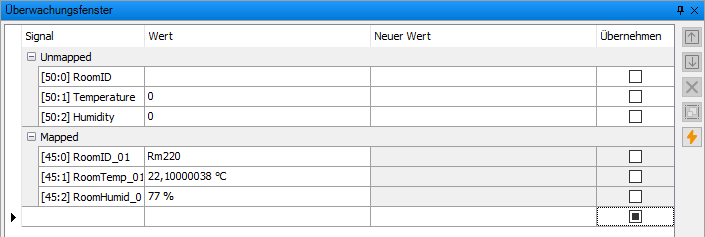
Thereby, you can manually assign values to these unmapped signals. For signals which do not apply to this function, the table cells are grey.
First, check the checkbox in the Apply column for the signals you want to assign a value to. Then, enter your preferred value in the New value column.
In order to apply the values to the signals, click on the lightning button at the right side or press <F6> on the keyboard. Make sure that you don't edit a cell value at this time, otherwise, the hotkey won't work. Digital signals can easily be flipped by pressing <F8> .
The New value and Apply columns support header clicking. It means that when clicking the column header, the contents of the selected cell for that column will be copied to the subsequent rows.
Note, that ibaQPanel signals can also be written using the watch view.