Autoscaling
In order to display a signal between its amplitudes in a graph, use the autoscale
function. Make a right click in the graph you would like to scale and choose "Autoscale".
All signals, i.e. all Y axes of this graph, will be scaled with respect to the highest
and lowest amplitude. If you would like to autoscale all graphs in a view, press <F5>
or click on the ![]() button in the view's toolbar.
button in the view's toolbar.
Scaling with the mouse
You can change the Y scale with the mouse. Position the mouse cursor near the upper end of the Y axis until two blue arrows and a dot appear.
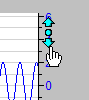
Mouse click (hold down) on the up-arrow: the scale is stretched (zoom in).
Mouse click (hold down) on the down-arrow: the scale is compressed (zoom out).
Mouse click on the dot: the scale is autoscaled.
If you use a mouse with scroll-wheel, you only need to place the mouse cursor on the Y scale and move the wheel up or down for changing the scale. This also works on the X axis. There is also such a function for the FFT and oscilloscope views.
Scaling in the graph's properties
Right-click in the graph you want to rescale. Choose Properties from the context menu. A dialog opens which shows the settings of this graph. On the Y axis node you can set a scale by manually entering a lower and upper limit. If a graph has separate Y axes, there is one node for every Y axis in the dialog.
Note |
|
|---|---|
|
You can open the dialog for the display properties also via the Configuration - Preferences main menu. The settings you make there will generally apply to new views and graphs. Views and graphs already there will not be changed. |
|