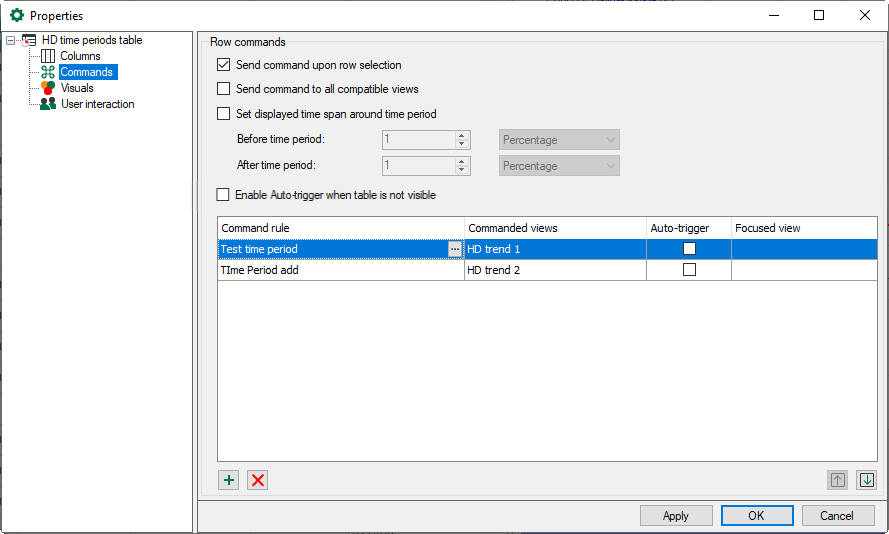
Time period tables can be linked to HD trend graphs, which means that when you double-click on a row in the table the HD trend graphs show the time period selected in the row from start to end.
The Send command to all compatible views option is enabled by default. This means that when you double-click on a row in the table, all HD trend graphs show the selected time period. In this case, the command rules are disabled.
If you enable Send command upon row selection, you only have to select a row to execute the command, instead of double-clicking on the row.
The Set displayed time span around time period option enables you to add an additional time span before and/or after the period in which the signals are shown in an HD trend graph.
If you only want certain HD trend graphs to show the selected time period, disable the Send command to all compatible views option and configure appropriate command rules.
A command has the following properties
-
Command rule: The rule defines the time period to which the command applies. You can select time period stores or define conditions for columns.
-
Commanded views: Here, you can select the views that you want to switch to the selected time period.
-
Auto-trigger: If Auto-trigger is enabled, the command is triggered when a row that meets the rule is added to the table. If Auto-trigger is not enabled, you have to select or double-click on the row, depending on the Send command upon row selection option, to trigger the command.You can configure an auto-trigger for three different situations:
-
Start time: The related trends jump to the start time of a new time period.
-
End time: The related trends jump to the end time of a new time period.
-
start time/end time: The related trends show the complete time span from start time to end time after a time period has ended.
-
-
Focused view: Here, you can select whether you want to enable a different view after the command has been triggered.
Note |
|
|---|---|
|
The list of command rules is checked from the top down when you double-click on a row in the table. When the first applicable rule is found, the check is finished and the command is forwarded to the assigned views. |
|
You can change the order using the arrow buttons to move the selected row up or down.
Configure command rule
You can change the order using the arrow buttons to move the selected row up or down.
![]() Adds a new rule.
Adds a new rule.
![]() Deletes the selected rule.
Deletes the selected rule.
![]() Opens the editor for editing the rule
Opens the editor for editing the rule
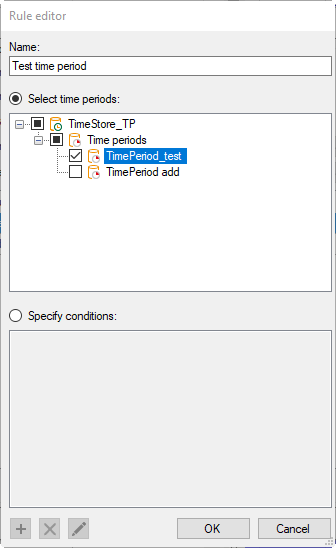
Add a new command rule. The Rule editor dialog opens.
First give the rule a meaningful name. A rule provides two mutually exclusive methods.
If you enable the Select time periods option, you can select one or more time periods in the tree below that trigger a switching of the HD trend view when a row is either selected or double-clicked.
If you enable the Specify conditions option, then you can enter check conditions in the field below that are executed when double clicking on a row. In auto-trigger mode, the conditions are checked continuously.
If a condition is met, the trend view is switched.
Configuring conditions
The procedure for configuring a condition is the same as that for event tables. See chapter Commands.

