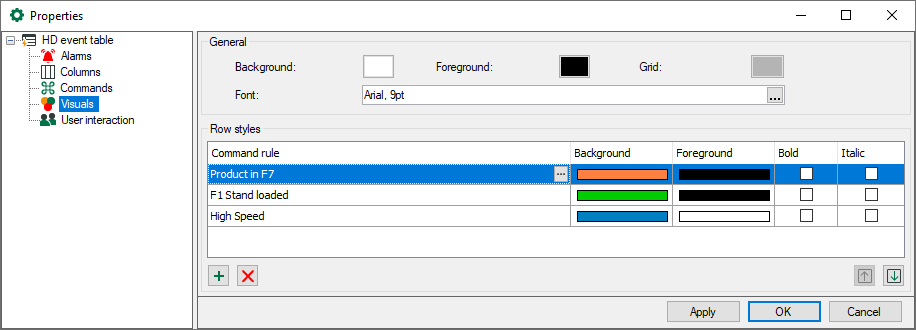
Similar to the commands (see above), the style of the rows in the event table can be controlled, depending on the properties of the occurred event.
In the "Pane" heading in the properties of the event table, you can set such row styles locally on the ibaPDA client.
Note |
|
|---|---|
|
For every event, you can specify the row style globally already during the event definition (configuration of the HD record, tab Client options). These global row styles are overwritten by the local settings that you make in the properties of the event table. |
|
General
Here, you set the overall performance of the event table, background and foreground color, the color of the grid and the font.
Row styles
In the "Row styles" list, you create rules and corresponding style modifications (background and foreground color, bold and italic print of the font).
![]() Adds a new rule at the end of the list.
Adds a new rule at the end of the list.
![]() Deletes the marked rule.
Deletes the marked rule.
![]() Opens the editor for editing the rule
Opens the editor for editing the rule
Note |
|
|---|---|
|
By double-clicking, the list of rules is checked from the top to the bottom. At the first applied rule, the check will be finished and the style modification will be made. You can modify the sequence of the rules: Use the button |
|
Add a new command rule.
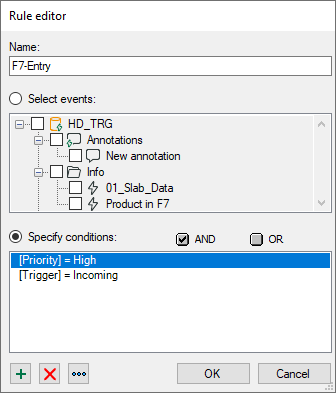
The dialog Rule editor opens.
First give the rule a meaningful name.
A rule offers two mutually exclusive methods.
If you enable the "Select events" option, then you can mark one or more events in the tree below that are shown with the row style corresponding to the rule.
Tip |
|
|---|---|
|
This method is suitable if you want to assign a row style to certain events. |
|
If you enable the "Specify conditions" option, then you can formulate check conditions in the field below that are checked constantly during acquisition.
If a condition is met, the corresponding event is provided with the row style.
A condition can consist of one or more expressions that are linked with each other.
![]() Adds a new expression.
Adds a new expression.
![]() Deletes the marked expression.
Deletes the marked expression.
![]() Opens the editor for editing the expression.
Opens the editor for editing the expression.
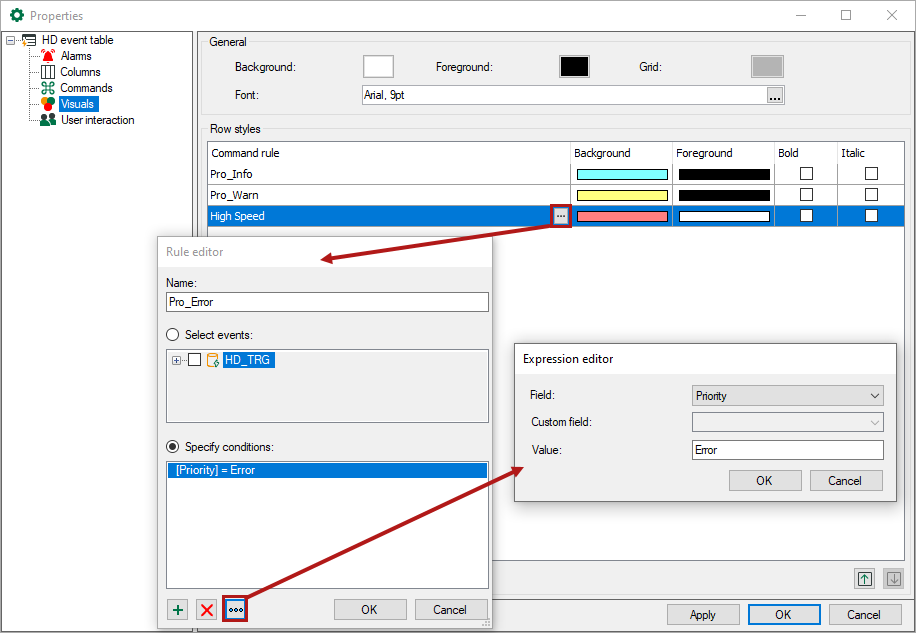
If a condition contains several expressions, then these will be linked with a logical AND or OR. In the Edit expression dialog, first select a field (e.g. event, comment, trigger, etc.) and then a value (e.g. event name, plaint text incoming/outgoing, etc.)
In the example below, for all events the background is colored red and the font is shown in bold. The events meet the requirement priority = "Error".
The row styles shown above as an example change the appearance of an event table as follows:


