Trigger modes
You can choose between several trigger modes when using a start trigger for data storage:
No start trigger
If this item is checked, no trigger is enabled. In this case, the recording will start immediately at the start of the measurement or when pressing the "Go" button.
Trigger on signal
If you want the trigger to fire on a measured signal or a virtual signal, you need to check "Trigger on signal" in the trigger mode dialog.
-
Field 1 Dropdown list for signal selection (available analog and digital signals)
-
Field 2 Dropdown list for selecting edges or levels
-
Field 3 Dropdown list for selecting the trigger level value given in the specific physical unit (field 3 is only enabled in case of analog trigger signals)
Both analog and digital signals can serve as triggers. The signal to trigger on is to be selected from the drop-down lists in the fields nearby (see picture below, field 1). In the drop-down list, you will find the well-known signal tree containing available signals. Select the signal you want to use as trigger signal.
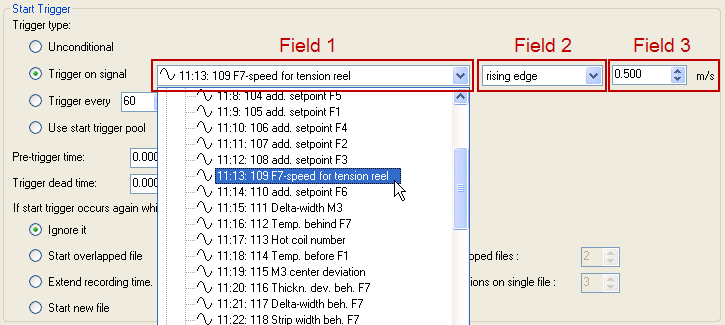
Depending on whether a digital or an analog signal was selected, the fields 2 or 3, respectively, are offered allowing the trigger event to be defined more specifically.
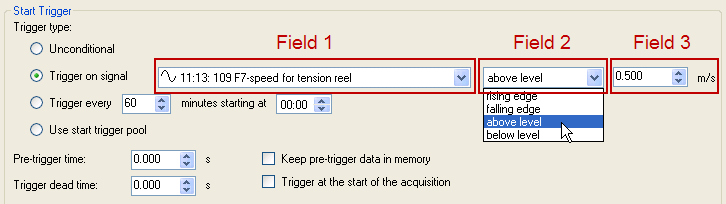
As for analog signals, you can choose between level or edge triggers including a predefined level (field 3). An edge in the context of analog values is a transit of a measured value through a predefined level.
-
Rising edge: The value exceeds the level.
-
Falling edge: The value undercuts the level.
The setting above/below level is available for start trigger only. It is used to make sure that the recording will start immediately with start of acquisition if the start trigger condition (value is above or below level) is fulfilled at this time. See also explanation in the tip below.
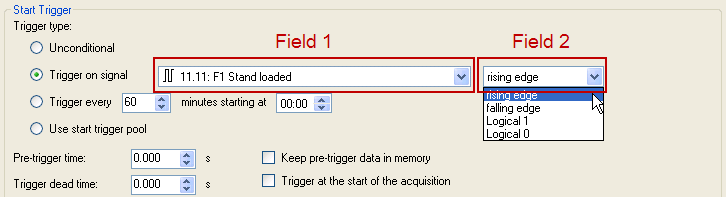
As for digital signals, you can choose between level or edge triggers including the 2 levels logical 0 (FALSE) and logical 1 (TRUE).
Information on the use of trigger edges
Tip |
|
|---|---|
|
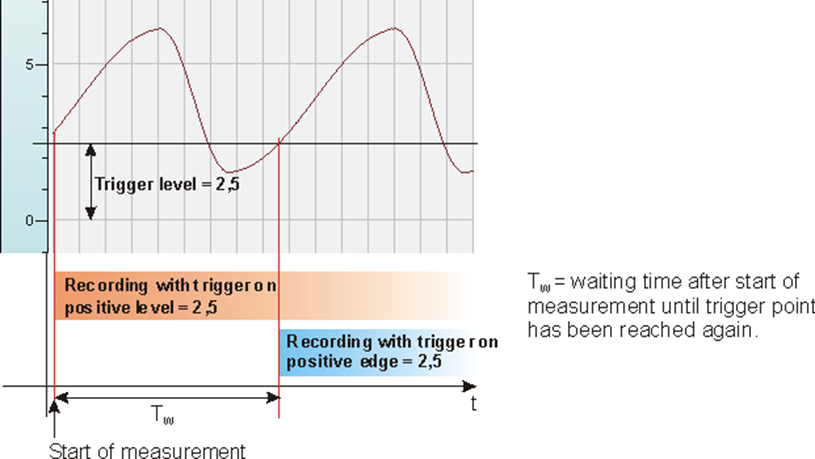
Care must be taken when using trigger edges! In order for a trigger to fire at a positive or negative edge, the value specified in field 3 must be at least slightly exceeded or fallen below. Otherwise, no trigger will occur. Therefore, it is often more useful to define a level trigger, which fires as soon as the signal reaches or exceeds/falls below the level defined in field 3. If this is the case already at the time the measuring starts, the recording will start immediately. The diagram shows the differences between the recording starts, which might occur depending on the trigger conditions and the time the measurement starts.
|
|
Periodic trigger
If you want to use a start trigger always at a certain time on a periodical basis, you can check the "Trigger every … minutes starting at …" option.
This is useful if you want records to be started every 8 hours, e. g. based on a work shift.
Enter the period given in minutes, or select it from the input field. Value range is from 0 to 1440, which equals one day. Then enter or select the start time for the first trigger. Value range is from 00:00 to 23:59, which equals one day.
Example
"Trigger every 480 minutes starting at 06:00" will generate the first start trigger at 06:00, followed by further start triggers every 8 hours (= 480 min), that is at 14:00 and 22:00. The last trigger on that day will fire at 22:00. The next trigger will then fire at 06:00 on the following day.
In order to ensure the recording of data files of exactly 8 hours without a sample lost, set the "Maximum file time" to 9 hours and enable the “Start new file” option (in case another start trigger fires while the recording is already running).
If you want the recording to start immediately at acquisition start or as soon as you apply a new data storage configuration, you also need to check the "Trigger on start of the acquisition" option. The first data file created will then contain the range from the restart of the acquisition or data storage to the next trigger.
Tip |
|
|---|---|
|
The periodic trigger at a specified start time is useful for creating data files beginning at second 0 of one minute. If you, for instance, want to create data files of 1 minute length from second 0 to 59, use the periodic trigger with the settings "Trigger every 1 minute(s) starting at 12:34" (any time). Set the "Maximum file time” to 2 minutes and enable the "Start new file” option (in case another start trigger fires while the recording is already running). |
|
Use start trigger pool
Enable this option if you want to use the trigger signals from the start trigger pool. See Trigger pool.
Pre-trigger time
Setting a possible pre-trigger time.
If this function is selected by entering a time value, recording begins immediately when the measurement starts. In this case, the measured data is stored periodically in a file, with its length of time corresponding to the pre-trigger time, or in the computer memory. If the trigger condition is met, the incoming data is added to the data buffered during the pre-trigger time. Therefore, the file start does not match the trigger time at the end of recording.
In the offline analysis with ibaAnalyzer, the trigger times of the start and stop trigger are marked by two arrows in the graph.
If you want to use the start trigger pool, you can determine that the trigger name is added to the filename of the data file. Go to "Files" in the configuration dialog of the data storage and enable the "Add start trigger name" option.
Keep pre-trigger data in memory
Enable this option if you prefer to store the pre-trigger data in the computer memory instead of a file on the hard disk. Be sure to have sufficient RAM installed when you choose this option.
Trigger dead time
This property is available for every start trigger type (signal trigger, periodic trigger and start trigger pool). The trigger dead time determines the time of suppressing subsequent triggers after a trigger occurred.
If the dead time, for instance, is set to 5 seconds, all other triggers are ignored for the duration of 5 seconds after the first trigger occurrence.
Trigger at the start of the acquisition
If you have defined a start trigger (any type) and restart the acquisition or apply a new data storage configuration to the server, the recording will not start unless the trigger fires at the same moment. Without a trigger occurrence at this time, you will have to wait until the trigger fires and the recording starts.
Check this option if you want to make sure that the recording starts immediately after restart of acquisition and/or data storage regardless of any start trigger condition.
If start trigger occurs again while file is already recording, then:
Ignore it
Selecting this option will cause the system to ignore any new start trigger during a running recording for as long as the stop trigger occurs.
Start overlapped file
This option should be used to save measured data in separate files, in case they depend on more than one independent but overlapping trigger events.
If a start trigger occurs, a file is created, in which the measured data will be saved. If another start trigger fires during a running recording, another file is created for storing the measured data. When the first stop trigger fires, the first file will be closed; the second file will be closed when the second stop trigger occurs.
So, this mode allows the start trigger of the subsequent recording to occur before the stop trigger of the recording currently running, i.e. temporarily parallel recordings in two successive files of the same file series. This mode is needed for overlapping, linked processes.
The overlapped mode is not limited to two files only. Three or more files are also possible, depending on the number of start triggers occurring before the first stop trigger fires and the defined maximum number of files.
Maximum number of overlapped files:
If you have selected the "Start overlapped files" option, you should set the number of permissible overlapped files. Usually, two are sufficient. You may, however, adjust the number according to your needs, i. e. how many start triggers you expect to occur before the stop trigger fires.
Rule of thumb: number of possible start triggers during a recording + 1 = max. number of overlapped files.
Upper limit is 10.
Extend recording time
As an alternative to the overlapping mode, choose this option if you prefer to extend the running recording in case another start trigger occurs during the running recording. Each additional start trigger extends the recording time by the time which is set as "Maximum file time" above. This occurs as often as set in the "Maximum number of extensions on single file" field. If the max. number of extensions is reached, all subsequent start triggers will be ignored. The recording will then be stopped after the last maximum recording time has elapsed. Of course, the recording is stopped immediately by any stop trigger.
Maximum number of extensions on single file
If you have selected the extended recording mode, you may set the maximum number of extensions in this field. If this limit of extensions is reached, the recording is stopped after the maximum file time at the latest.
Start new file
The current data file is closed and a new file created. So, the start trigger can serve as a stop trigger at the same time.