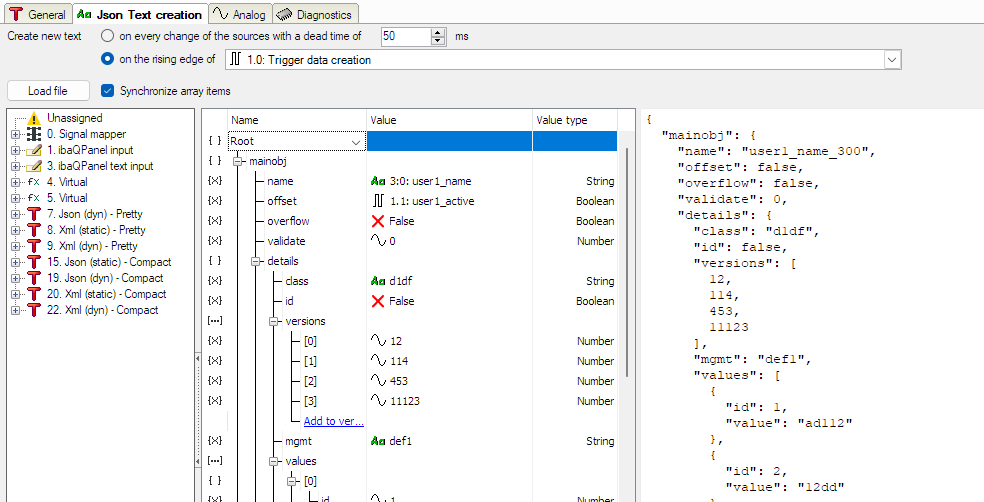
If you select the mode XML or JSON under Format in the module settings, then you will get the tab Xml text creation or Json text creation.
In this tab, you can define the data structure, which is then to be used in the next step as text source.
Note |
|
|---|---|
|
The module is able to translate XML-specific structures into valid JSON and vice versa. However, it is not recommended to define an XML-targeted structure (e.g. with XML attributes) and then use it as JSON. |
|
The following example explains the text creation with JSON.
On top, you can define when the new text is to be created.
Create new text in the event of any change…/rising edge…
The choice between these two options determines whether the text is to be considered a new text as soon as its content changes or with the rising edge of a digital signal.
If you choose the first option, then a new text is automatically generated if the values of the source signals change that are part of the text. Changes that occur within the period of the set dead time, are ignored.
If you intend to control the text creation with a signal, enable the second option and select a digital signal from the dropdown list in the tree structure.
<Load file> button
If you already have a file (*.json or *.xml) at hand, which you want to use as a template for the data structure, you can import the file over this button.
Synchronize array items
If you enable this option, then all structural changes you make for one array item will be copied to all other items of the same array.
For more information see chapter Synchronize arrays
Configuration area
The dialog is divided in 3 sections:
-
Signal tree (left)
The signal tree contains all applicable signals, see Signal tree
-
Data structure tree (center)
In the data structure tree you define the data structure. Data structure tree
-
Preview pane (right)
The preview shows the result of the data structure. Whenever you change the data structure, the preview is refreshed automatically. The preview does not display signal values. Instead, it shows a combination of signal name and signal ID.
