In the Text creation tag, you construct the text for the text signals to be created in the next step.
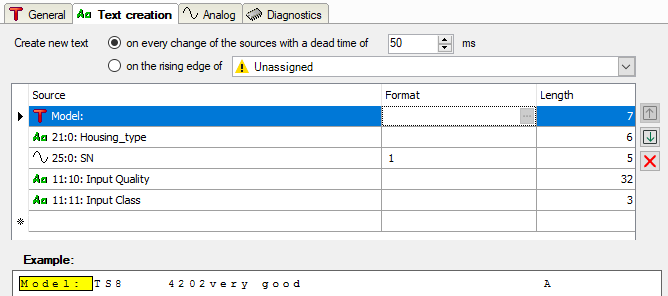
The following figure shows an example for text creation with static text, text signals and measurement signal.
If you want to use the signal values of other signals in the new text, this must have been defined beforehand.
Above the table, you can define when the new text is to be created.
Create new text in the event of any change…/rising edge…
The choice between these two options determines whether the text is to be considered a new text as soon as its content changes or with the rising edge of a digital signal.
If you choose the first option, then a new text is automatically generated if the values of the source signals change that are part of the text. Changes that occur within the period of the set dead time are ignored.
If you intend to control the text creation with a signal, enable the second option and select a digital signal from the dropdown list in the tree structure.
Configuration table for the text
Configure the text using the table. Each row corresponds to a source delivering alpha-numeric data. One or more sources, or rows, can be configured for a text. In total, the resulting text may not contain more than 10,000 characters.
As soon as writing starts in one row, the table automatically expands by a row.
The sequence of the sources (top-down) determines the sequence of their contents in
the text (left-right). The arrow keys on the right next to the table allow you to
change the arrangement of the sources. If you want to remove a source from the table,
select the corresponding row and click on the button ![]() .
.
There are different types of sources available. You can select the source type or the source signal in the first column of the table using the dropdown list in the cell.
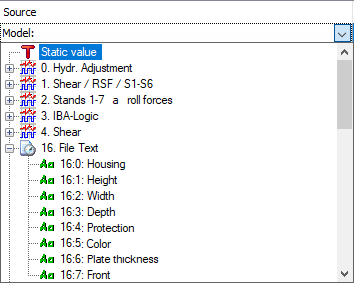
You have the following options:
Static value
Select this type if you want to enter fixed text, which does not change. Enter the text in the Source column. The Format column is not relevant. The Length column shows the character length of the text. It is updated automatically when you click outside the Source column.
Signals from different interfaces
Select any signals from the signal tree to use the values of measured or virtual signals in your text. Optionally, you can specify the format of the signal value. To do so, click the <...> browser button in the Format field.
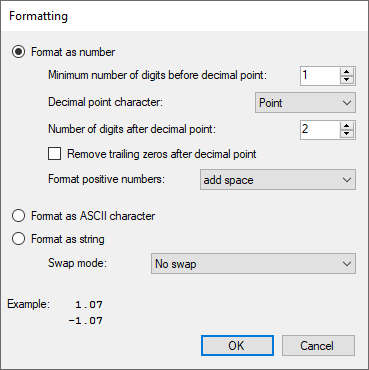
If you like to use the value in decimal format specify the number of digits before and after the decimal point. Consider the possible size of the signal value and allow for enough digits. If negative values are permitted, decide how to deal with positive numbers; either choose from the selection list whether a space or a "+" should be added or no operation is required.
If you enable the Option Format as ASCII character option, the signal value will be interpreted as ASCII code and the corresponding ASCII character will be used for the text, e.g., "65" --> "A."
If you select the option Format as string, the raw bytes of the signal value are interpreted as characters. A floating point value is 4 bytes which are interpreted as 4 characters. Int32 is also 4 characters and Int16 is 2 characters. You can choose between different swap options. The general result is shown in the example area of the dialog window.
Text signal
Simply select already existing text signals (recognizable by the green Aa icon) if you want to reuse existing texts in the custom text. The Format column is not relevant. In the Length column, you will initially find the length of the selected text signal (number of characters). You can shorten the length if you only want to use part of the original text signal.
Once you have set up the source(s), you will see the complete text in the preview area under the table.
The preview area only shows the apposition of the text from the sources and does not take any delimiters into consideration. The latter first occurs in the next step, in the Analog tab, provided the split mode Delimited was selected in the General tab.