By means of the Create shortcut command in the File menu, you can have multiple clients running on the same computer. This can then be very helpful especially when administrating different ibaPDA systems in large scale installations from a central workstation. The individual clients can be connected to different servers, each of them with a different layout.
The configuration file, which is stored with the creation of every shortcut, contains:
-
the server that the client connects to and
-
the initial position and size of the client window
The directory to which the configuration file is stored serves as the base directory for client files (layout file, log files, address books, etc.)
Without setting up different desktop shortcuts, you can start multiple clients with individual configuration files on a computer by using the command line call and the "/config" switch.
For more information, see /config: command line switch.
In order to create a shortcut, follow these steps:
-
Go to the menu item File – Create shortcut….
The Create shortcut dialog opens.
-
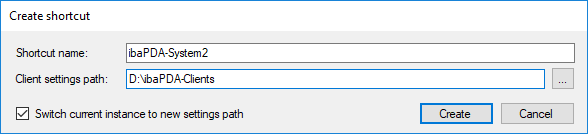
Enter a plain-text name for the shortcut, indicating the server it links to. By default, the name is formed from "ibaPDA" followed by the name of the currently connected server.
-
The path for the client settings is the base directory for the client files corresponding with the shortcut. Enter an appropriate path according to your needs if required. With the settings shown in the screenshot above, ibaPDA will create the
D:\ibaPDA-Clients\ibaPDA-System2directory. In this directory, ibaPDA will then create a configuration file as well as the current layout file. A shortcut with the name, "ibaPDA-System2", is subsequently created on the desktop that links toibaPDA.exe /config:"D:\ibaPDA-Clients\ibaPDA-System2\ibaPdaClient.cfg". -
Check the Switch current instance to new settings path option if you want ibaPDA to switch its current directory to the new shortcut directory. This will save all subsequent changes made to the layout or the server connection in the directory of the shortcut. If this selection box is activated, ibaPDA will act as if it was started from the shortcut. If the selection box is deactivated, ibaPDA will not change its current directory and no changes will be made.
-
Click the <Create> button.
If you want to create more shortcuts to other ibaPDA servers, iba AG recommends the following procedure.
-
Close the current instance of ibaPDA client and start a new one (not by the previous shortcut).
-
Connect the desired ibaPDA server.
-
Open the client preferences, select the Connections node and choose "Last connected server" for connection on startup. You may choose "Default server", but in this case make sure that the correct server is specified in the field Default server.
-
Then create a new shortcut as described above.
Example
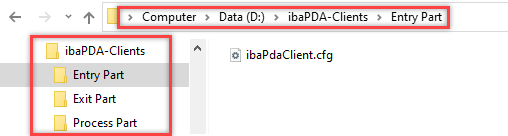
In the case of a large plant with multiple ibaPDA systems, e.g., for the plant's lead-in area, processing area and lead-out area, you can create three shortcuts for the ibaPDA clients on your desktop.

In the file system, this appears as follows: